COURSE NAVIGATION
- ▶ Pixometry
- ▶ What is Pixometry?
- System requirements
- Access to network folders
- Installation
- ▶ General user-interface navigation
- ▶ Channel types
- ▶ Settings image processing channel
- ▶ Settings of a cropping channel
- ▶ Settings of a routing channel
- ▶ Settings of a Device Link channel
- Workflows
- ▶ Photoshop Inspector
- ▶ Indesign JobClient (Plugin)
- ▶ Support
- ▶ Tips & Tricks
- How to upgrade from previous versions
- Google Vision API configuration and use-cases
- Cropping Channels
- Best practices to tune enhancement settings
- Processing CMYK images
- Camera RAW file support
- Processing PDF files
- Check if images are already processed
- XMP routing
- To resample or not to resample
- File sizes
- PSD Support
- Understanding File Ready Delay and Its Impact on Processing Time
- ▶ Pixometry Integration options
- XML Jobtickets
- Image node tag definitions (the only mandatory node!!)
- Input node tag definitions
- Size node tag definitions
- QualityCheck node tag definitions
- Workflow node tag definitions
- PDF node tag definitions
- GrayscaleConversion node tag definitions
- ImageEnhancement node tag definitions
- IPTC node tag definitions
- JobControl node tag definitions
- Output node tag definitions
- ▶ Pixometry Imagin
- ▶ Pixometry (on prem edition)
- ▶ What is Pixometry?
- ▶ System Requirements
- ▶ Installation and registration
- Start the user-interface
- ▶ General user-interface navigation
- ▶ Channel types
- ▶ Settings image processing channel
- ▶ Settings of a cropping channel
- ▶ Settings of a routing channel
- ▶ Settings of a Device Link channel
- ▶ Settings of a Purging channel
- ▶ Multi-server setup (cluster)
- ▶ Photoshop Inspector
- ▶ Indesign JobClient (Plugin)
- ▶ Working with licenses
- ▶ Support
- ▶ Tips & Tricks
- How to upgrade from previous versions
- Google Vision API configuration and use-cases
- Cropping Channels
- Best practices to tune enhancement settings
- Processing CMYK images
- Camera RAW file support
- Processing PDF files
- Tuning performance and memory settings
- Setting up a one2many workflow
- Check if images are already processed
- XMP routing
- To resample or not to resample
- File sizes
- PSD Support
- Restore backup database
- Firewall settings for Pixometry cluster
- ▶ Pixometry Integration options
- XML Jobtickets
- Image node tag definitions (the only mandatory node!!)
- Input node tag definitions
- Size node tag definitions
- QualityCheck node tag definitions
- Workflow node tag definitions
- PDF node tag definitions
- GrayscaleConversion node tag definitions
- ImageEnhancement node tag definitions
- IPTC node tag definitions
- JobControl node tag definitions
- Output node tag definitions
Workflow
Pixometry allows for automatic flows (from input to output folder without human intervention), semi automatic workflows (send problem images to Inspector) or a workflow where all images need to be approved using Inspector.
Above is a screenshot of the Workflow settings of a processing channel. It starts with a drop-down menu of the main workflow options. The contents of the drop-down menu can be seen in the screenshot below. After that an explanation of the options.
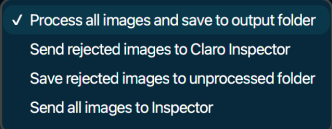
Process all images and save to output folder
This is a fully automatic workflow. Images will be taken from the input folder, processed and written to the output folder.
Send rejected images to Photoshop Inspector
This is a semi automatic workflow. Problem images will be detected and send to the Photoshop Inspector queue for approval. All other images are processed and send to the output folder.
Save rejected images to unprocessed folder
This is a semi automatic workflow. It means that based on image analysis in combination with Quality Check settings, problem images will be detected and send to the folder for unprocessed images. All other images are processed and send to the output folder.
Send all images to Inspector
All images are enhanced and then send to the Photoshop Inspector queue.
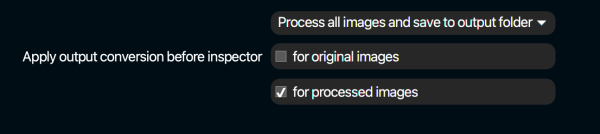
Apply output conversion before Inspector
For original images
If checked, the original image as displayed in Photoshop Inspector is already converted to the output colorspace. If unchecked, the original image is still in its original colorspace. Conversion will be done after the Inspector approval.
For processed images
If checked, the processed image as displayed in Photoshop Inspector is already converted to the output colorspace. If unchecked, the processed image is still in the working RGB colorspace in which it was enhanced. Conversion will be done after the Inspector approval.