COURSE NAVIGATION
- ▶ Pixometry
- ▶ What is Pixometry?
- System requirements
- Access to network folders
- Installation
- ▶ General user-interface navigation
- ▶ Channel types
- ▶ Settings image processing channel
- ▶ Settings of a cropping channel
- ▶ Settings of a routing channel
- ▶ Settings of a Device Link channel
- Workflows
- ▶ Photoshop Inspector
- ▶ Indesign JobClient (Plugin)
- ▶ Support
- ▶ Tips & Tricks
- How to upgrade from previous versions
- Google Vision API configuration and use-cases
- Cropping Channels
- Best practices to tune enhancement settings
- Processing CMYK images
- Camera RAW file support
- Processing PDF files
- Check if images are already processed
- XMP routing
- To resample or not to resample
- File sizes
- PSD Support
- Understanding File Ready Delay and Its Impact on Processing Time
- ▶ Pixometry Integration options
- XML Jobtickets
- Image node tag definitions (the only mandatory node!!)
- Input node tag definitions
- Size node tag definitions
- QualityCheck node tag definitions
- Workflow node tag definitions
- PDF node tag definitions
- GrayscaleConversion node tag definitions
- ImageEnhancement node tag definitions
- IPTC node tag definitions
- JobControl node tag definitions
- Output node tag definitions
- ▶ Pixometry Imagin
- ▶ Pixometry (on prem edition)
- ▶ What is Pixometry?
- ▶ System Requirements
- ▶ Installation and registration
- Start the user-interface
- ▶ General user-interface navigation
- ▶ Channel types
- ▶ Settings image processing channel
- ▶ Settings of a cropping channel
- ▶ Settings of a routing channel
- ▶ Settings of a Device Link channel
- ▶ Settings of a Purging channel
- ▶ Multi-server setup (cluster)
- ▶ Photoshop Inspector
- ▶ Indesign JobClient (Plugin)
- ▶ Working with licenses
- ▶ Support
- ▶ Tips & Tricks
- How to upgrade from previous versions
- Google Vision API configuration and use-cases
- Cropping Channels
- Best practices to tune enhancement settings
- Processing CMYK images
- Camera RAW file support
- Processing PDF files
- Tuning performance and memory settings
- Setting up a one2many workflow
- Check if images are already processed
- XMP routing
- To resample or not to resample
- File sizes
- PSD Support
- Restore backup database
- Firewall settings for Pixometry cluster
- ▶ Pixometry Integration options
- XML Jobtickets
- Image node tag definitions (the only mandatory node!!)
- Input node tag definitions
- Size node tag definitions
- QualityCheck node tag definitions
- Workflow node tag definitions
- PDF node tag definitions
- GrayscaleConversion node tag definitions
- ImageEnhancement node tag definitions
- IPTC node tag definitions
- JobControl node tag definitions
- Output node tag definitions
Size

Skip images or downsample images
The Remove.bg engine, has a size limitation of 25 mega-pixels. For images that are more then 25 mega-pixels in size, you can choose whether you want to downsample those images so a mask can be created, or whether you want to skip those images and place them in the folder for unprocessed images.
Set DPI
Changes the DPI value to the specified value if checked.
Resample
Without resampling, setting the DPI value changes the physical (output) dimensions (size in mm or inches), not the number of pixels. With resampling enabled, the physical dimensions remain the same, and the number of pixels are changed accordingly. Use Resample only if the physical dimensions in the originals are known to be correct. Read more in To resample or not to resample.
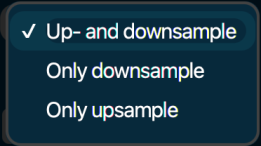
If Resample is checked, following drop-down menu becomes available.

Up- and down-sample
Always resample, whether it increases or decreases the number of pixels.
Only downsample
Resample only if it results in a decreased number of pixels
Only upsample
Resample only if it results in an increased number of pixels
Always set DPI
Change the DPI even if resampling is omitted as a result of the only-downsample or only-upsample options.
Units
Lets you choose between mm en inches as units for the size settings.
New size after resampling
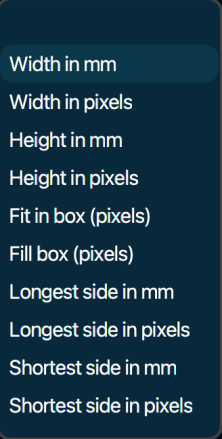
Lets you choose physical dimensions. It is optional. By leaving this blank, the physical dimensions of the original image are maintained. Below is a screenshot of the associated drop-down menu:

Choose one of the options (first one is empty, physical dimensions will not be changed) and specify a value in the field next to it. See examples below:
![]()
![]()
Resizing is always proportional. With the “fit-in-box” example, the longest side of the image will be 512 pixels, the other side will be scaled proportionally.
![]()
Resizing is always proportional. With the “fill box” example, if the width and height ratio of the image are not equal to the width and height ratio of the specified box, the image will be cropped. Either from top and bottom or from left and right.