COURSE NAVIGATION
- ▶ Pixometry
- ▶ What is Pixometry?
- System requirements
- Access to network folders
- Installation
- ▶ General user-interface navigation
- ▶ Channel types
- ▶ Settings image processing channel
- ▶ Settings of a cropping channel
- ▶ Settings of a routing channel
- ▶ Settings of a Device Link channel
- Workflows
- ▶ Photoshop Inspector
- ▶ Indesign JobClient (Plugin)
- ▶ Support
- ▶ Tips & Tricks
- How to upgrade from previous versions
- Google Vision API configuration and use-cases
- Cropping Channels
- Best practices to tune enhancement settings
- Processing CMYK images
- Camera RAW file support
- Processing PDF files
- Check if images are already processed
- XMP routing
- To resample or not to resample
- File sizes
- PSD Support
- Understanding File Ready Delay and Its Impact on Processing Time
- ▶ Pixometry Integration options
- XML Jobtickets
- Image node tag definitions (the only mandatory node!!)
- Input node tag definitions
- Size node tag definitions
- QualityCheck node tag definitions
- Workflow node tag definitions
- PDF node tag definitions
- GrayscaleConversion node tag definitions
- ImageEnhancement node tag definitions
- IPTC node tag definitions
- JobControl node tag definitions
- Output node tag definitions
- ▶ Pixometry Imagin
- ▶ Pixometry (on prem edition)
- ▶ What is Pixometry?
- ▶ System Requirements
- ▶ Installation and registration
- Start the user-interface
- ▶ General user-interface navigation
- ▶ Channel types
- ▶ Settings image processing channel
- ▶ Settings of a cropping channel
- ▶ Settings of a routing channel
- ▶ Settings of a Device Link channel
- ▶ Settings of a Purging channel
- ▶ Multi-server setup (cluster)
- ▶ Photoshop Inspector
- ▶ Indesign JobClient (Plugin)
- ▶ Working with licenses
- ▶ Support
- ▶ Tips & Tricks
- How to upgrade from previous versions
- Google Vision API configuration and use-cases
- Cropping Channels
- Best practices to tune enhancement settings
- Processing CMYK images
- Camera RAW file support
- Processing PDF files
- Tuning performance and memory settings
- Setting up a one2many workflow
- Check if images are already processed
- XMP routing
- To resample or not to resample
- File sizes
- PSD Support
- Restore backup database
- Firewall settings for Pixometry cluster
- ▶ Pixometry Integration options
- XML Jobtickets
- Image node tag definitions (the only mandatory node!!)
- Input node tag definitions
- Size node tag definitions
- QualityCheck node tag definitions
- Workflow node tag definitions
- PDF node tag definitions
- GrayscaleConversion node tag definitions
- ImageEnhancement node tag definitions
- IPTC node tag definitions
- JobControl node tag definitions
- Output node tag definitions

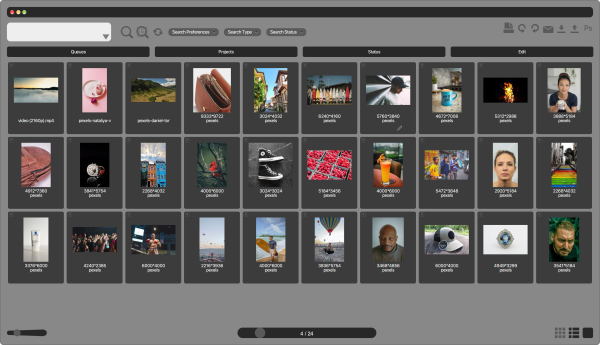
The user interface is devided in 3 main parts. The upper part of the UI has the standard search box on the left. There are several search options located on the right side of the search box. More on searching here.

In the upper right side of the UI, there are icons to print assets, rotate images left and right, email assets, up- and download assets, and open assets in their associated applications.
In the middle part of the UI the search results are shown. Below the thumbnails there are options to browse through the results and change the view:

With the slider you can change the size of the thumbnails.

With this slider you can browse through the pages of search results. In this example, there are 24 pages of search results, and you are currently on page 4. You can drag the knob, click into the dark gray area of the bar or use the arrow buttons on your keyboard to browse through the pages.

With these options you can select different views. The lighter gray one is the one that is currently selected. The views allow you to choose views with less thumbnails and more metadata or vice versa.